Template Projects
This tutorial helps you creating your first projects on TheUno, BigBrother and BigBrother-USB with Freescale CodeWarrior V10.2 (Eclipse Edition).
Some template projects are attached to this tutorial and can be imported in your CodeWarrior workspace to start easily.
You can download the full article and source codes using the following link:

1. Creation of the project
Launch CodeWarrior and select a workspace.
Go in "File", "New", and finally click on "Bareboard Project". A wizard is displayed. Give the name of your project ("TEMPLATE_THEUNO" in this tutorial).
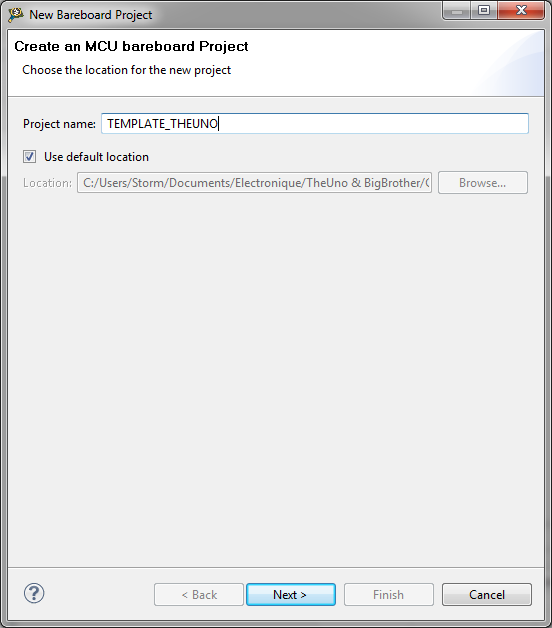
Click "Next".
The wizard then asks the microcontroller chosen. Indicate that you are using the MC9S08DZ60 device.

Keep the default project type ("Application") and click "Next".
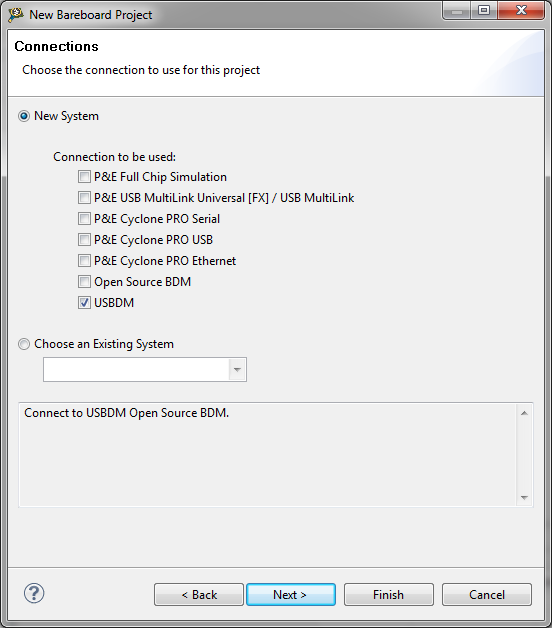
Finally choose to use the USBDM.
The remaining options will be kept to their default values. Click "Finish" to create the project. The project is now available in the C/C++ perspective of CodeWarrior.
2. Initialization of the microcontroller
The initializations of the microcontrollers are already done when the "main()" function is called. You can immediately write your own application.
However, the microcontrollers are by default using an internal clock source (default configuration of the MCG peripheral). You can decide to keep this configuration or you can switch to the external crystal available on the evaluation boards.
The following function can be used on TheUno to initialize the clock at 18MHz.
{
MCGC2 = 0x36;
while (MCGSC_OSCINIT != 1) {}
MCGC1 = 0xB8;
while (MCGSC_IREFST != 0) {}
while (MCGSC_CLKST != 0b10) {}
MCGC1 = 0x98;
MCGC3 = 0x46;
while (MCGSC_PLLST != 1) {}
while (MCGSC_LOCK != 1) {}
MCGC1 = 0x18;
while (MCGSC_CLKST != 0b11) {}
}
And the following function can be used on BigBrother and BigBrother-USB to initialize the clock at 24MHz.
{
MCGC2 = 0x36;
while (MCGSC_OSCINIT != 0b0) {}
MCGC1 = 0x98;
while (MCGSC_IREFST != 0b0) {}
while (MCGSC_CLKST != 0b10)) {}
MCGC3 = 0x48;
while (MCGSC_PLLST != 0b1) {}
while (MCGSC_LOCK != 0b1) {}
MCGC1 = 0x18;
while (MCGSC_CLKST != 0b11) {}
}
3. Adding sources files to a project
You can add source files to your project. Right click on the "Sources" directory of the wanted project. Choose "New" and then "Source File" or "Header File" to create a new file. Finally give the name of the file to create it. It is also possible to copy and paste an existing file to your project. After that, header files can be included in your application.
Finally, in order to build the application, the "Sources" directory need to be added to the list of "Include directories". If not, the builder will not be able to find your header files. Right click on your project and then on "Properties". Develop "C/C++ General" menu and click on "Path and Symbols".
Click "Add", then "Workspace" and finally browse to the "Sources" directory of the project. Click "OK".
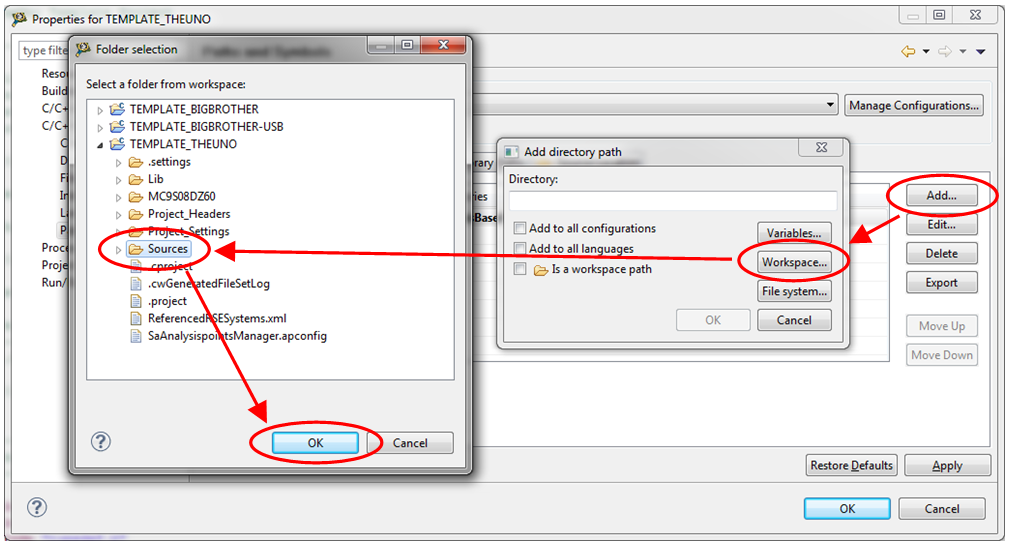
Validate "Add to all configurations" and "Add to all languages" checkboxes and click "OK".

Finally apply the changes by clicking "OK" in the properties window. You can now rebuild your project by clicking the hammer in CodeWarrior workspace.
Conclusion
Starting with Freescale microcontrollers is very simple. No fuse, no mandatory initialization to perform after the creation of the project. You can immediately start writing your own application.
The template projects available on this page give you a starting point to build your own projects with TheUno, BigBrother and BigBrother-USB evaluation boards.